Hi friends! The Christmas weekend is upon us, and if you’re anything like me, you’re probably looking forward to some eats as you celebrate with friends and family. I shared this recipe last year, but I’ve been asked by several friends to post the how-to’s behind oreo truffles again. This is a super easy recipe that anyone (I mean dang, I can do it) can tackle! Be prepared to impress your friends and family with Oreo Truffles! Also, while you’re making these, head on over to Vlogmas to bring some entertainment to your kitchen!
First things first, what you’ll need:
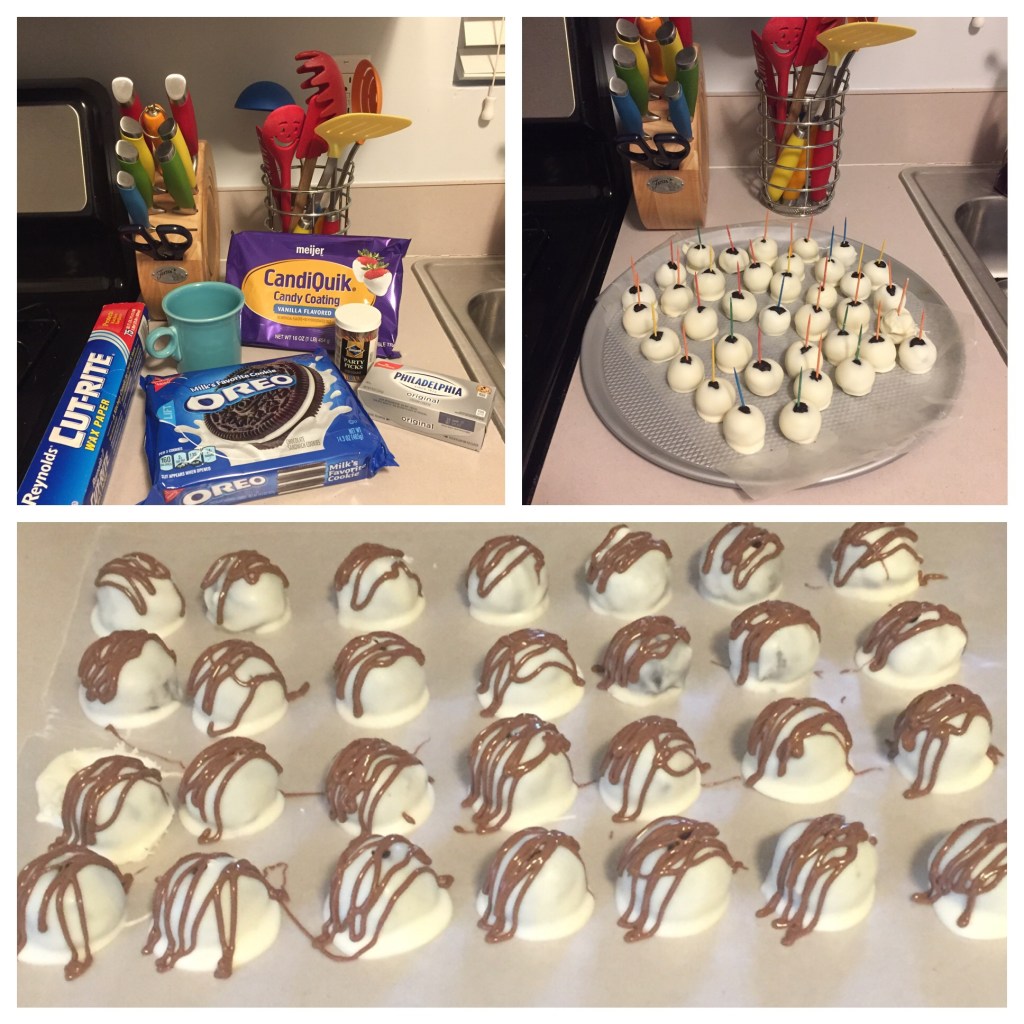
1. One package of Single Stuffed Oreos (double will ruin the consistency!!)
2. One 8 oz. package of Original Philadelphia Cream Cheese (low fat will ruin the consistency!!)
3. One (Two if you’re a first timer) 16 oz. package of candy or chocolate coating. This is totally a personal preference, but I’ve always had better luck with candy coating! I typically do white coating, but you can dabble with chocolate or colored coatings!
4. Toothpicks
5. Wax paper
6. 9”x13” cookie sheet
7. Several coffee mugs or a small sauce pan
8. Food processor, blender, or large ziplock bag and a rolling pin/mallet. I am the lucky owner of a food processor, and this is by far the easiest method.
9. Large mixing bowl
Optional: Fine (teeny) sprinkles of your choice, one full size milk chocolate bar.
*Holiday edit: Hit up Pinterest to see cute ideas for turning Oreo truffles into snowmen or otherwise Christmasfying them!

Okay, let’s get to not baking:
- Use your food processor, blender, or ziplock bag and rolling pin to crush the entire package of Oreos into a fine sand-like texture. Do not waste time scraping the icing out of the cookies, as the icing is the most delicious part, duh. (In my food processor, I blend one ‘row’ of Oreos at a time, and this seems to be the most effective way to handle it!)
- In a large mixing bowl, thoroughly combine all of the crushed Oreos with the entire 8 oz. block of cream cheese. This is more easily done if you use a butter knife to cut the cream cheese into eight or so smaller slivers. I find the hand mixing method to be the quickest way to combine these two ingredients, as well as the messiest. Also, it is weirdly satisfying.
- Once you’ve combined the crushed cookies and cream cheese into something that looks like a giant Oreo covered rock, place the bowl into your freezer for 15 minutes.
- Place a sheet of wax paper onto your cookie sheet, covering it entirely. Remove your chilled Oreo boulder from the freezer and use your hands to mold into small ball shapes. I’ve had these ingredients make anywhere from 22 (??) to 35 (Also, ??) Oreo balls depending on size, number of mishaps, and the will power to not eat as I go.
- After you’ve molded your mixture into balls, return them all to the freezer for 20 to 30 minutes.
- Toward the end of this chilling time frame, you’ll want to begin preparing your candy/chocolate coating. This is undeniably the most frustrating portion of the process, heads up! (Oops, you’ve come this far and I’m like heads up, stuff’s about to suck!) Though I have used a sauce pan before, my preferred method of coating for maximizing candy coating is to melt two ‘blocks’ of candy coating in a coffee mug in the microwave. In my opinion this works best because you’re making the most of your coating before it thickens, and the coffee mug gives you a deeper pool to work with. I melt the coating in 15 second intervals as to not ‘burn’ it, and it takes me foreffingever. So there’s that.
- Once the coating is melted, I remove the balls from the freezer 5-10 at a time and place a toothpick in each. **If you let them sit out in room temperature while you’re coating, they will inevitably become soft and make the process that much more difficult! Use the toothpick for some control while dipping the ball into coating and roll the ball around to cover as much surface as possible. Return coated truffles to the wax paper cookie sheet. I’m usually able to get 8-10 balls covered per mug of coating, and I will go through the melting process anywhere from 3-5 times per batch.
- Let coating cool, remove toothpicks, and then you can be done!!! But, if you want to make things look a tad fancier and you didn’t have a second set of hands to add sprinkles as you were coating, keep reading!
- Place half of a milk chocolate candy bar into a small ziplock (or piping) bag. Melt this chocolate in the microwave in 10-15 second intervals. Once the chocolate is fully melted, cut a very very tiny hole into a bottom corner of your ziplock bag, quickly drizzle zig zag shapes across the top of your Oreo truffles. Not only does this cover the toothpick hole, but if gives you some melted ‘glue’ to toss some sprinkles into. Place your truffles in the fridge to cool and then they’re ready to serve!
**Remember we used cream cheese, so try not to leave these out and about for hours and hours! If you’re bringing them to your office, throw them in the fridge for a bit every few hours, if they even make it that long, and they won’t!
There you have it! Oreo truffles are delicious, simple, and sure to impress anyone you’ll be feeding this weekend. What are some of your favorite holiday recipes? Share a link in the comments below!
xoxo my genetic makeup is 12% Oreo

Leave a comment